If you are orienting on setting up a Z-Wave network you have probably come up with tons of questions regarding the installation of such a network. Luckily there have been people who have done it over and over again. In the last couple of years I have setup several good running Z-Wave networks. And while it might look overwhelming at first, it is actually quite easy once get the grip of it. In this guide we will look at the steps required in detail ranging from the controller all the way up to sensor.
Setting up a Z-Wave network requires a two step process. First you need a Z-Wave controller that basically controls the entire network and is the brain of the Z-wave network. Next you need one or more devices to control with the Z-Wave controller. Z-Wave devices are for example light switches, motion sensors etc.
Table of Contents
How to setup a Z-Wave controller?
The first step in our guide is setting up the brains of the Z-Wave system. This is known as the Z-Wave controller. A Z-Wave controller is the boss on the Z-Wave network and sends out control signals. The Z-Wave controller can come in several forms. But the most popular two forms of a Z-Wave controller are:
- A Z-Wave hub
- A Z-Wave USB stick
If you go for a Z-Wave hub this is usually a all in one device providing you with a connection to the Z-Wave network, but also a connection to a wired or wireless (Wi-Fi) network. The last couple of years self contained hubs have become less popular. But one still very popular example of a Z-Wave hub is the Samsung Smarthings hub. Smarthings provides out of the box support for Z-Wave.
On the other end of the spectrum you have a Z-Wave USB stick which you can connect to a computer/ raspberry PI, NAS system or any other computing unit you can think of. Z-Wave USB sticks are usually a bit cheaper then Z-Wave controllers. But Z-Wave USB sticks also come with a bit more complexity, you need some technical skills in order to set this up.
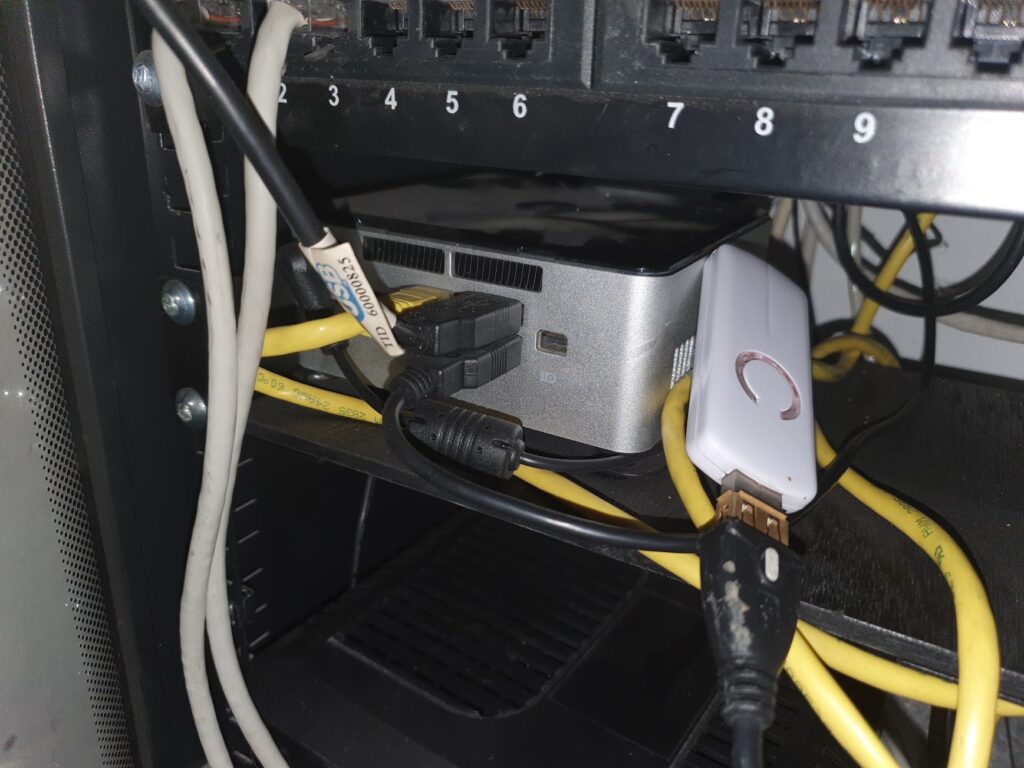
In my smart home, I have good experiences with the Aeon Labs Z-Wave sticks. I have been using them for years, and I run them on my Intel NUC that runs Home Assistant. Here is a picture of what this looks like in practice. Please note that I am a crazy enthusiast and this by no means has to be your type of setup.
I recommend that you take a critical look at all the Z-Wave hubs and Z-Wave USB sticks out there, and make a choice that suits your needs. For your convenience we listed some pros and cons of both options in the table down below:
| Pros | Cons | |
| Z-Wave HUB | – All in one solution, which is easier for beginners – Great support from manufacturer. | – More expensive. – Less flexibility, if the vendor decides to drop support you cannot switch to a different platform – Vendor lock in, you cannot switch to a different platform. |
| Z-Wave USB stick | – Great flexibility you can choose your own software. – Cheaper then the Z-Wave HUB option. | – Requires more technical skills. – Requires a computing unit to run. |
Choosing the right physical location of your Z-Wave controller
After you bought your first controller, it is very important to give the physical location of the controller a good thought. While Z-Wave acts as a mesh network, that means that nodes within the network actually connect to one another and do not require a direct connection to the controller, it is still a good idea to think about the physical location. I have put my Z-Wave controller in a central place in my home. This allows the controller to reach all the sensors easily. Theoretically Z-Wave should be able to cover 100 meters of range, but in practice I found that concrete walls sometimes lower this number by a great deal.
Also keep in mind that some sensors in the Z-Wave network, such as battery powered devices just act as a sensor and do not repeat any Z-Wave traffic to other nodes. Examples of devices that actually do transfer Z-Wave messages are for example Z-Wave wall switches. These types of devices will act as a repeater for Z-Wave messages in the network.
Another important aspect is that your Z-Wave controller should have a stable connection to the internet and Wi-Fi network. If possible I highly recommend that you wire your Z-Wave controller using an ethernet cable. This provides the best stability and user experience.
Choosing the right user interface (GUI)
One choice that you also have to make when considering a Z-Wave hub is the user interface that you are going to use. If you choose a Z-Wave USB stick you have several choices in software such as: Home Assistant, OpenHAB, Domoticz or one of the many other home automation software systems out there. If you are going for a Z-Wave hub you are stuck to that specific vendor, examples are Fibaro, SmartThings and others. So thinking about the right user interface that suits your needs is also an important step when it comes to choosing a Z-Wave controller.
How to setup Z-Wave devices in your network?
Ok great, so we have a Z-Wave controller up and running. Now the fun part can begin and we can look at several devices to use within our Z-Wave network. The sky is the limit nowadays, but I recommend you start with a small step first. My suggestion would be to start out with a Z-Wave light switch, one of the socket ones that does not require any electrical wiring just to get your feet wet.
Controlling lights is so convenient, just imagine the limitless possibilities of smart lights. Such as, controlling them from your smart phone, controlling them when you are away from home. And even automating all kind of light scenarios based on occupancy or any other automation that you can imagine. Also for the sake of stability of the Z-Wave network smart sockets are a good idea. As these devices will act as repeaters (devices that will repeat and strengthen the Z-Wave network) which will improve the stability of your Z-Wave network.
Of course you are not limited to just automating lights. Nowadays there is a wide range of Z-Wave devices to choose from. The only limitation is your imagination. For example there are complete HVAC control systems on Z-Wave, temperature sensor, motion sensors and many more.
Connecting and pairing devices
Once you got your very first device, you need to pair it with the Z-Wave network. Pairing devices to the network is usually a two step process. First of all you need to put the Z-Wave controller in a so called inclusion mode which basically means that the controller will be put in a ready state to connect to other Z-Wave devices.
In this example I will use the Aeon Labs Z-stick. You can put the Z-stick in inclusion mode by simply pressing the button on the stick. The inclusion mode will be indicated by a flashing led on the stick itself.
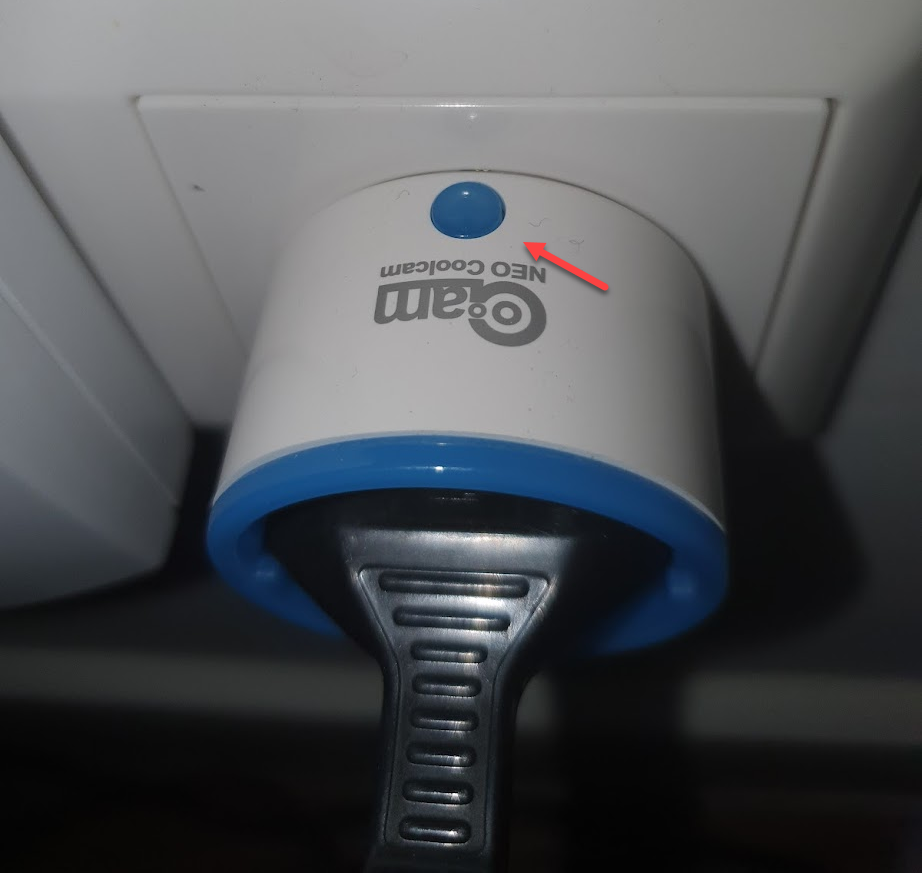
When the controller is in inclusion mode, other Z-Wave devices can be paired with the controller. This will basically exchange information between the controller and the specific device such as the network key for security. To pair a device with the controller you need to press the inclusion button on the device. For example I have a image below of a Z-Wave wall plug, this wall plug has a dedicated inclusion button.
After you clicked the inclusion button on the device, the Z-Wave controller should blink this indicates that the Z-Wave inclusion of the new device was successful. This successful pairing now allow you to use the device from the controller.
What is the cost of a Z-Wave system?
Now that we got a basic idea of what a typical Z-Wave network needs, lets talk a bit about the costs of all of this. The quick answer is: it depends. We talked about the two major options, either a Z-Wave controller or a Z-Wave USB stick.
The devices cost the same for both type of options. But the basic costs can differ. If you are looking at a Z-Wave hub you will be looking at around a $300,- price tag for hub. A Z_Wave stick ia s cheaper option at around the $50,- price tag but it will require an additional hardware such as a Raspberry PI (around $100,-).
So if you look at the basic price tag and your first basic Z-Wave plug you will be looking at the range of $150,- to $400,- for a really basic system. But this can greatly add up if you add more devices to the network.
How to maintain your Z-Wave system?
Once you have your network up and running you need to maintain your Z-Wave system in order to keep it running properly. Over the years I learned about a few important aspects to keep your Z-Wave network running smoothly. Maintenance is a bit heavy wording if you talk about Z-Wave networks, they are pretty much self maintained. But there are a few things to just keep in mind and which you need to periodically maintain in order to keep it running smoothly.
1. Remove broken devices
The first important aspect of maintaining your Z-Wave network is to remove any broken devices. A broken node can greatly disturb a Z-Wave network. What will happen is that neighbouring nodes will not be able to send messages through or to the broken node. This will result in messages being repeated on the network and utlaimtely jamming the network if there are a lot of broken devices within the network. Here is my advice as it comes to broken Z-Wave nodes:
- Remove the broken device as quickly as possible.
- Exclude the device from the network. You can check the manual of your Z-Wave device for the proper procedure to exclude the device from the network.
2. Battery powered devices
Also take special care of battery powered devices. These devices will not act as a repeater within the Z-Wave network but can sometimes harm your network if they are not reachable. The controller will keep trying to send messages to the absent battery powered device. Keeping batteries fresh at all time is a good idea. Pro tip: you can even setup notification messages if battery powered devices reach the end of their battery life.
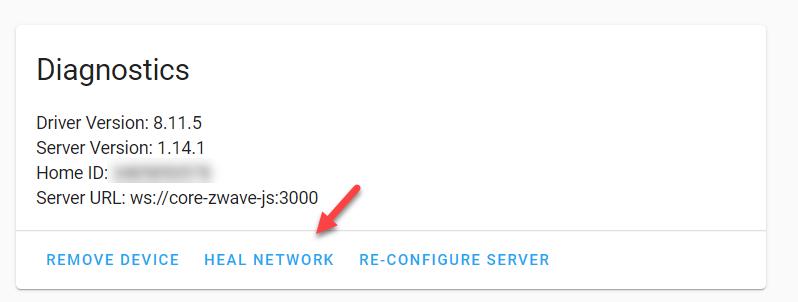
3. Repair/ heal your Z_Wave network periodically
Another important aspect of maintaining your Z-Wave network is to repair your Z-Wave network periodically. Repairing I hear you ask, do I need to hire someone to repair it? Don;t worry it is something that you can do yourself. You have to consult the manual of your Z-Wave controller, but basically what this does is checking all the paths within the Z-Wave network to check if they are still healthy and available.
Other that these three steps, there is not a lot to take care of in a Z-Wave network. I have been running Z-Wave networks with little to no maintenance for years, so you can do it to!